Please visit the desktop version of this website to be able to import the collection into your Asana.

💳 Expenses
5 essential fields for inputting and tracking all your company's expenses.
Custom fields included | Custom field type | Description |
|---|---|---|
🚀 Expense status | Single-select | Single select field to track the status of your expense as a task. |
💳 Expense type | Single-select | Single-select field to select 1 of 7 expense categories which can be edited to add/remove other options. |
💵 Expense value | Number | Currency type number field used to input the value of an expense. This field can be easily changed to other currencies. |
👤 Manager | People | People field to select any member as the manager of an individual or department within your organisation. |
👥 Team / Dept. | Single-select | Single-select field to select 1 of 11 preset teams or departments within your organization which can be edited to add/remove more options. Useful to trigger rules to multi-home tasks into each team's pipeline. |
Requirements and notes:
You will need to have purchased an Asana Premium/Starter, Business/Advanced or Enterprise plan in order to use Custom fields.
Custom fields are not available as a feature on Asana's Basic free plan. For more information please visit asana.com/pricing
* Formula fields are available for only Business/Advanced and Enterprise plans.
If you are on the Premium/Starter plan, you will still be able to import any projects containing formula fields but they will not appear.
1
2
3
4
5
Import the collection into your Asana as a project
Click on the button below to instantly import the above collection as a project into your Asana space, which includes all the custom fields listed above. Make sure you are logged into to your Asana account on your default browser.
Clicking this button will open your Asana account in a new browser tab. The import process may take a few seconds, please wait for it to complete.
💡 You should find the imported project added to the first team in your sidebar under the 'Teams' section.
🔒 The project is set to private so only you will initially have access to it. Feel free to move it to another Team.
❗ If your Asana account is connected to multiple Asana instances (Organizations or Workspaces), the project will import into the Asana space that you last switched to, from your profile / avatar dropdown menu.
❗ If you get an error message during import, it means your Asana is in a non-US data center which is not currently supported, sorry!
Add the custom fields to your Asana library
For each custom field that you want to add to your library, repeat the following:
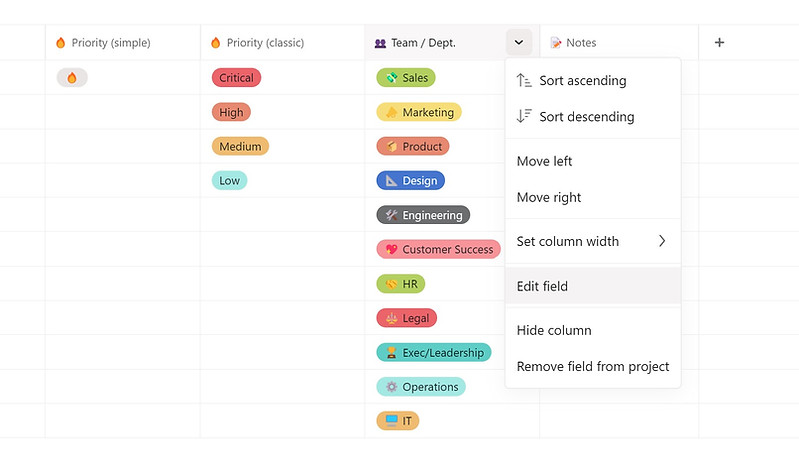
From the header of the custom field's name, click the down arrow and from the dropdown menu, select 'Edit field'.
Checkmark the first box which says 'Add to [Your organization]'s field library' to add the custom field to your Asana library.

This field will now be available to add to any project or portfolio by any member in your Asana.
Edit the custom field as you like
For each custom field that you want to edit, repeat the following:
From the header of the custom field's name, click the down arrow and from the dropdown menu select 'Edit field', as per step 2.
Edit the field name and options as you wish; you can also change the emojis and colours of the options for any single-select and multi-select fields.

❗ For single-select, multi-select, date and people type custom fields, you will have the option to 'Notify task collaborators when this field's value is changed'. Choose carefully whether you want to notify others whenever a member changes a value of this field or not. In some cases you may prefer not to select this, in order to reduce the amount of notifications that all task collaborators will receive in their Asana Inbox.

❗ For Business plan and above, you will have the option 'Only you can edit this field's settings'. Selecting this field will lock it so that the only you can make changes to the field's name and options. However, note that Administrators of your Asana space are the only ones who can override this.
Add the custom fields to any project or portfolio
Adding a custom field to a Project
-
In any Project, from the 'Customize' menu (top right), under 'Fields' select 'Add custom field' then select the tab 'Choose from library'. Alternatively, from any project's List view, click on the '+' at the end of your column headers on the right and select 'Choose from library'.
-
Then type the name of the custom field that you saved to your library in step 2. Once you find the custom field from the search list, click on it to add it to your project.
Adding a custom field to a Portfolio
-
In any Portfolio, from the 'Customize' menu (top right), select 'Add field'. Alternatively, from any Portfolio's List view, click on the '+' at the end of your column headers on the right.
-
Then select the tab 'Choose from library'.
-
Then type the name of the custom field you saved to your library in step 2. Once you find the custom field from the search list, click on it to add it to your portfolio.
Delete or archive the project you imported
Once you have added the required custom fields to your library, you no longer need the project that you imported in step 1 so you can either:
-
Delete the project if you have added all the custom fields to your library.
-
Archive the project if you may want to add some custom fields to your library later on.
Feel free to move the project into another Team which is dedicated for storing such projects.